Ricoh GR III Blue Hour Photography: Settings, Tips, and Best Recipes
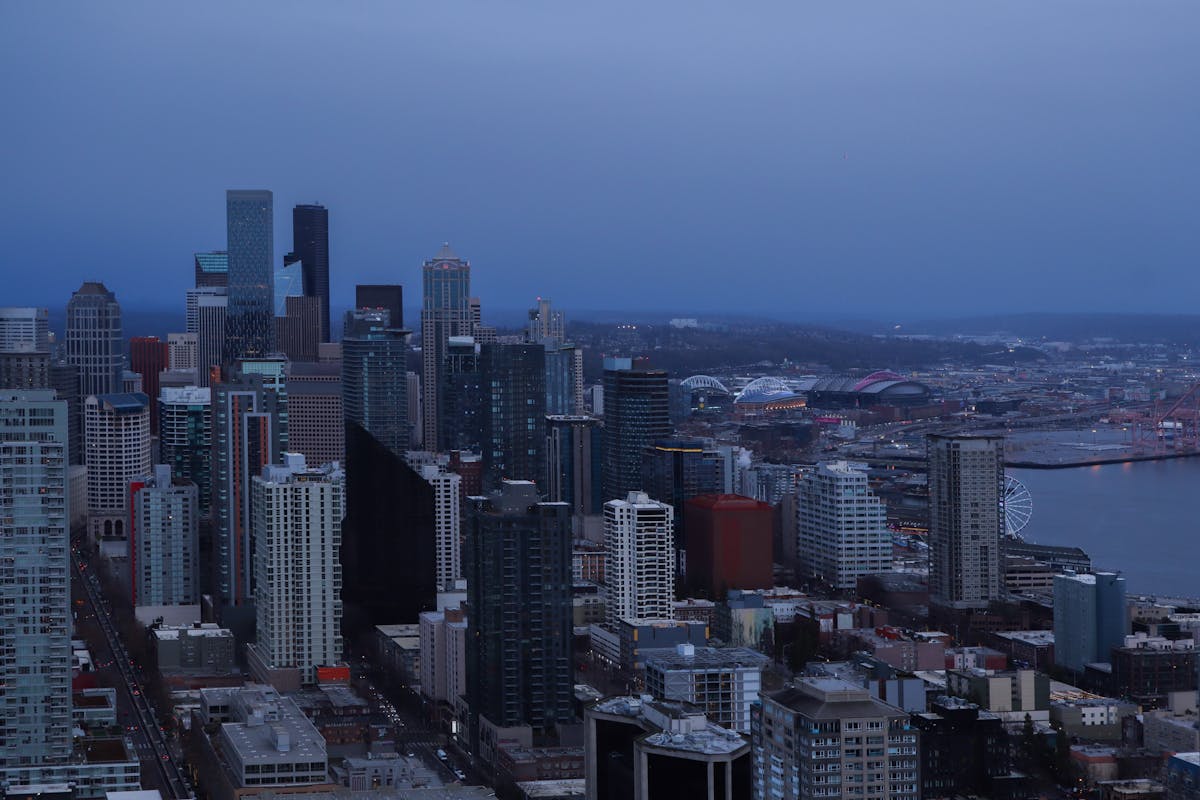
Blue hour -- the brief window of deep, saturated twilight that occurs roughly 20 to 40 minutes after sunset or before sunrise -- produces some of the most atmospheric light in photography. The sky turns a rich cobalt blue, artificial lights glow warm against cool shadows, and the world takes on a cinematic quality that no other time of day can match. The Ricoh GR III, with its fast f/2.8 lens, effective Shake Reduction, and pocketable size, is a surprisingly capable blue hour camera once you know how to set it up.
This guide covers the camera settings, preset recipes, and field techniques you need to make the most of blue hour with your GR III.
What Makes Blue Hour Special
Blue hour sits in the transitional zone between golden hour and full darkness. It has distinct qualities that set it apart from any other shooting condition:
- Deep blue sky tones that are impossible to replicate in broad daylight or full night, creating a rich backdrop for any subject
- Warm-cool contrast as artificial lights (tungsten, neon, LED) glow orange and yellow against the cool blue ambient light
- Balanced exposure range where the sky still holds detail and city lights are visible but not yet blown out -- the dynamic range sweet spot
- Smooth, even lighting with no harsh shadows, making it ideal for architecture, cityscapes, and street scenes
- Reflective surfaces come alive as wet pavement, rivers, and glass buildings mirror both the blue sky and warm city lights
The GR III's Shake Reduction system, rated at up to 4 stops, extends your handheld shooting capability well into this low-light window. Combined with its sharp 18.3mm f/2.8 lens, you can capture clean blue hour images without a tripod in many situations.
Essential Camera Settings for Blue Hour
Shooting Mode: Aperture Priority or Manual
Aperture Priority (Av) works well in the early stages of blue hour when the light is still changing rapidly. Set your aperture and let the camera handle shutter speed. Use exposure compensation to fine-tune brightness.
Manual mode (M) becomes more useful as blue hour deepens and the camera's meter starts to struggle. At this point, the meter may overexpose the scene, trying to brighten the darkness rather than preserving the moody twilight atmosphere. Switch to Manual and set your exposure based on the histogram.
Aperture Selection
Your aperture choice depends on the scene:
- f/2.8 for handheld shooting in deeper blue hour when you need maximum light gathering. Also excellent for isolating warm light sources with bokeh
- f/5.6 for a balance of sharpness and light, good for general street-level blue hour scenes
- f/8 for cityscapes and architecture where you want corner-to-corner sharpness and starburst effects on point light sources
If you are using a tripod or stable surface, stop down to f/8 for the sharpest results. The starburst effect on streetlights and building lights at smaller apertures adds a polished look to blue hour cityscapes.
ISO Strategy
Blue hour demands more from your ISO than golden hour, but less than full night shooting. The goal is to keep ISO as low as possible while maintaining a usable shutter speed.
Configure Auto ISO through MENU > Shooting Settings > ISO Sensitivity:
- ISO range: 200-3200
- Minimum shutter speed: 1/30s for static scenes (the Shake Reduction handles the rest), 1/125s for street scenes with moving people
For tripod shooting, lock ISO at 200 for maximum image quality and let the shutter speed extend as needed.
Handheld, expect to work in the ISO 800-1600 range during peak blue hour. The GR III produces clean, usable files up to ISO 3200, which covers the full blue hour window for handheld work.
White Balance: Preserve the Blue
White balance is critical during blue hour, just as it is during golden hour -- but in the opposite direction. You want to preserve the cool blue tones rather than fight them.
Avoid Auto White Balance. AWB will try to warm up the scene and neutralize the blue cast, which is exactly what makes blue hour special. The result looks like an overcast day rather than a moody twilight.
Use one of these settings instead:
- Daylight (5200K) is the best starting point. It renders blue hour light as your eyes see it: cool blue sky with warm artificial lights creating a natural contrast.
- Fluorescent (4000K) pushes the scene cooler, intensifying the blue tones for a more dramatic, cinematic feel. Good for urban scenes where you want to emphasize the twilight mood.
- Manual Kelvin at 4500-5500K gives you precise control. Lower values (4500K) produce a cooler, more intensely blue image. Higher values (5500K) keep things closer to neutral with warmer highlights.
- CTE (Color Temperature Enhancement) can work well during blue hour, amplifying the existing cool tones in the sky while preserving warm tones in artificial lighting. The result is enhanced warm-cool separation.
Metering and Exposure
Blue hour metering is tricky. The camera sees a dark scene and wants to brighten it, which washes out the atmospheric twilight mood.
Center-weighted metering is the most reliable option. It gives consistent readings that you can offset with exposure compensation.
Use exposure compensation to control the mood:
- -0.3 to -0.7 EV for most blue hour scenes -- this preserves the twilight atmosphere and keeps the sky a deep, saturated blue
- -1.0 EV for dramatic, moody interpretations where shadows go dark and only the lights punch through
- 0 EV in the early stages of blue hour when the sky is still relatively bright
Check your histogram regularly. The blue channel clips easily during blue hour, so watch for a spike hitting the right edge of the histogram. If you see it, dial back the exposure slightly.
Focus Settings
Low light challenges autofocus, so adjust your approach:
AF with Select point lets you place focus precisely on your subject. In low light, aim the focus point at a high-contrast edge -- the border between a lit window and a dark wall, for example.
Snap Focus at 2.5m or 5m is excellent for blue hour street photography. Set it and shoot without waiting for AF to hunt in dim conditions. At f/5.6 or smaller, the depth of field at these distances covers most street scenes.
Manual Focus with focus peaking gives you the most control for architectural and cityscape compositions. Enable focus peaking in the menu and set the highlight color to red for maximum visibility against blue-toned scenes.
Best Preset Recipes for Blue Hour
Twilight Cinema
This recipe creates a cinematic, movie-like rendering that capitalizes on blue hour's natural drama. Set Image Control to Standard, push Contrast to +1 for punchy light-to-dark transitions, and set Saturation to +1 to deepen the blue tones. Use Daylight white balance to maintain the natural warm-cool separation. Set Sharpness to +1 for crisp architectural detail. The result looks like a still frame from a noir film.
Cool Fade
A modern, editorial look that leans into the cool tones with a soft, faded quality. Set Image Control to Soft, Contrast to -1 to open up the shadows, and Saturation to -1 for muted, pastel-like colors. Use Fluorescent white balance to push the overall tone cooler. Set Shadow Adjustment to +2 to lift the darkest areas, creating a low-contrast, dreamy twilight atmosphere perfect for calm urban scenes.
Neon Nights
Designed for blue hour scenes with prominent artificial lighting -- neon signs, shopfronts, streetlights. Set Image Control to Vivid, keep Saturation at 0 (Vivid handles the boost), and push Contrast to +2 for strong separation between the warm lights and cool shadows. Use CTE white balance to maximize the color contrast between warm and cool light sources. Set Key Adjustment to -1 to slightly underexpose and make the lights pop against deeper shadows.
Blue Hour Monotone
Blue hour works surprisingly well in black and white because of the strong tonal contrast between light sources and shadows. Set Image Control to Hard Monotone for deep blacks and bright highlights. Push Contrast to +2 and enable Grain Effect at Low for a classic film look. The extreme tonal range of blue hour -- bright lights punching through deep shadow -- creates dramatic monochrome images with a timeless, street photography quality.
Ethereal Dusk
A softer, dreamier interpretation that works beautifully for waterfront scenes and reflections. Set Image Control to Soft, Contrast to -2, and Saturation to +1 to produce rich but gentle colors. Use Manual Kelvin at 5000K for a balanced warm-cool tone. Set Sharpness to -1 and Shadow Adjustment to +1 for smooth tonal gradations. The result is a painterly, tranquil image that emphasizes the quiet beauty of twilight.
Composition Techniques for Blue Hour
Find the Warm-Cool Contrast
The defining visual feature of blue hour is the contrast between cool ambient light and warm artificial sources. Build your compositions around this contrast. Frame a warmly lit cafe against the deep blue sky. Shoot a row of glowing streetlights leading into the blue distance. Place a warm-toned building against the twilight backdrop. This temperature contrast is what separates a blue hour photo from a generic night shot.
Use Leading Lines into the Light
Streets, bridges, rivers, and railway lines all make powerful leading lines during blue hour. The eye naturally follows these lines toward the brightest point in the frame -- typically a cluster of city lights or a glowing building on the horizon. The GR III's 28mm equivalent field of view is wide enough to capture sweeping leading lines while keeping the destination visible.
Embrace Reflections
Blue hour is the best time of day for reflection photography. Water surfaces, puddles, wet streets, and glass facades all become mirrors that double the visual impact of your scene. The sky's blue tone and the warm artificial lights create a color palette in the reflections that is rich and complex. Get low to the ground for puddle reflections, or find elevated viewpoints where rivers and harbors mirror the city above.
Frame with Silhouettes
Trees, lampposts, bridges, and architectural elements make strong silhouettes against the blue hour sky. The sky retains enough brightness to serve as a luminous background, while foreground elements go dark and graphic. Position these dark shapes at the edges or lower third of the frame to create depth and visual anchors.
Shoot Both Orientations
Blue hour scenes often work in both landscape and portrait orientation. A wide cityscape captures the sweep of the twilight sky, while a vertical composition can emphasize a tall building or a narrow street leading toward the lit horizon. The GR III's fast operation makes it easy to shoot both orientations quickly before the light changes.
Field Techniques
Time Your Session Precisely
Blue hour is short -- typically 20 to 30 minutes. Use a sun-tracking app to know exactly when civil twilight begins and ends at your location. Arrive 10 minutes before blue hour starts so you can scout compositions while there is still enough light to move around comfortably.
The sweetest spot within blue hour is often the middle third, when the sky is deep blue but still holds gradient detail, and artificial lights are fully on but the sky has not yet gone black.
Brace for Stability
Even with the GR III's Shake Reduction, slower shutter speeds during blue hour benefit from extra stability:
- Lean against a wall or pole to steady your body
- Rest the camera on a flat surface like a railing, bench, or ledge -- use the 2-second self-timer to avoid shake from pressing the shutter
- Tuck your elbows in and exhale slowly when pressing the shutter
- Use Interval Shooting set to 2 exposures at 1-second intervals to get a sharp backup frame without a tripod
Use the Self-Timer or Interval Composite
For sharper results in deeper blue hour, set the self-timer to 2 seconds. This eliminates camera shake from pressing the shutter button. On a stable surface, this simple technique can get you tripod-quality results.
The GR III's Interval Composite mode can also blend multiple frames for extended-exposure effects, smoothing water and blurring clouds while keeping buildings sharp.
Shoot RAW + JPEG
Blue hour is one of the situations where shooting RAW alongside JPEG pays off. The RAW file preserves the full dynamic range of the scene -- important when you have both bright lights and deep shadows in the same frame. Your JPEG preset gives you a finished look straight from the camera, while the RAW file is insurance for fine-tuning the white balance or recovering highlight and shadow detail later.
Enable RAW+ through MENU > Shooting Settings > File Format > RAW+.
Work the Transition
Do not stop shooting at a single moment. Blue hour is a continuous transition from warm twilight to cool darkness, and the best images might come from any point along that gradient. Start shooting in the late golden hour as the sky begins to shift, continue through peak blue, and keep going until the last traces of blue fade to black. Each phase has its own character and mood.
Common Blue Hour Mistakes to Avoid
Trusting Auto White Balance. AWB robs blue hour of its defining characteristic. Set your white balance manually to Daylight or cooler, and let the scene look as blue as it actually is.
Overexposing to brighten the scene. The darkness is the point. If your blue hour photos look like daytime with blue-tinted clouds, you are overexposing. Dial in negative exposure compensation and embrace the shadows.
Waiting too long to start. Blue hour begins before you think it does. The transition from golden to blue is gradual, and some of the most interesting shots come from the in-between phase where warm and cool tones coexist in the sky.
Ignoring foreground interest. A beautiful blue sky means nothing without a compelling foreground. Look for lit buildings, moving people, reflective surfaces, or strong architectural shapes to anchor your compositions.
Chimping too much. Checking every shot on the LCD wastes precious blue hour minutes. Trust your settings, shoot actively, and review later. The LCD also displays images brighter than they will appear on a calibrated screen, which can trick you into underexposing further than necessary.
Planning Your Blue Hour Sessions
Blue hour duration varies with latitude and season. Near the equator, the transition from sunset to darkness is rapid, giving you a compressed blue hour window of 15 to 20 minutes. At higher latitudes in summer, blue hour can stretch to 45 minutes or longer.
Overcast skies reduce the blue hour effect by blocking the deep blue zenith, but partly cloudy skies can enhance it dramatically. Clouds catching the last warm light at the horizon while the overhead sky glows blue create layered, painterly scenes.
Urban environments are the classic blue hour setting, but do not overlook natural landscapes. Mountains, coastlines, and lakes during blue hour offer a serene, otherworldly quality that is completely different from the energetic urban look.
Putting It Together
Blue hour photography with the Ricoh GR III is about preserving atmosphere. Set your white balance to honor the cool tones, use exposure compensation to maintain the twilight mood, and lean on the GR III's Shake Reduction to keep shooting handheld as the light fades. The camera's compact size means you can move quickly through a city, catching different vantage points and compositions during the short blue hour window.
The warm-cool contrast of blue hour creates images that feel inherently cinematic and moody -- a look that is difficult to replicate in post-processing but easy to capture in camera with the right settings.
Explore our blue hour and twilight presets to find recipes optimized for low-light shooting, or grab a complete preset bundle that covers blue hour alongside every other lighting condition you will encounter.