Kodak Tri-X 400 Recipe for the Ricoh GR III: The Classic Black & White Film Look
No film stock is more woven into the history of photography than Kodak Tri-X 400. It is the film of Garry Winogrand, of war correspondents, of grainy concert prints and decisive-moment street frames. Tri-X doesn't flatter — it documents. Deep blacks, luminous highlights, and that unmistakable gritty grain gave a century of photojournalism its visual voice. The remarkable thing is that you can get strikingly close to that look in-camera with your Ricoh GR III, no darkroom required.
In this guide we'll dial in a complete Kodak Tri-X 400 film recipe for the Ricoh GR III, explain why each setting matters, and cover the light, subjects, and shooting style that make the look truly sing.
What Makes the Kodak Tri-X 400 Look
Before touching the menu, it helps to know exactly what you're chasing. Tri-X has a signature that's quite different from a clean, modern monochrome conversion:
- Rich, full blacks that anchor the frame without crushing every shadow detail
- Bright, slightly glowing highlights with a gentle roll-off rather than a hard clip
- Strong mid-tone contrast that gives faces, textures, and architecture real punch
- Visible, organic grain that adds texture and energy — never clinical, never smooth
- A documentary honesty — Tri-X renders the world as it is, with grit and grain intact
The GR III's Monochrome Image Control, combined with its grain effect and a few contrast tweaks, gets you remarkably close. The key is leaning into contrast and grain rather than away from them.
The Kodak Tri-X 400 Recipe for Ricoh GR III
Navigate to MENU > Still Image Settings > Image Control and select Monochrome as your base. Then dial in the following:
- Image Control: Monochrome
- Filter Effect: Off (or Yellow for slightly darker skies)
- Toning: 0 (neutral — Tri-X is a true neutral black and white)
- Saturation: N/A (monochrome)
- Hue: N/A (monochrome)
- High/Low Key Adjustment: -1
- Contrast: +2
- Contrast (Highlight): -1
- Contrast (Shadow): +2
- Sharpness: +1
- Shading: +1
- Clarity: +2
- Grain Effect: Strong
- White Balance: Auto (white balance has no effect on tone in Monochrome, but Auto keeps your live view neutral)
- ISO: Auto 200–3200
- Exposure Compensation: -0.3 as a starting point
Save this as one of your User custom modes (U1–U3) so you can recall it instantly on the street.
Why these settings work
Monochrome with neutral toning is the foundation. Tri-X is a true black and white — no warm sepia, no cool selenium cast in its standard form — so we keep toning at zero for an honest, neutral rendering.
Contrast at +2 with a strong shadow boost (+2) is what separates a flat digital conversion from a film look. Tri-X has muscular mid-tone contrast and dense shadows. Pushing global contrast and shadow contrast together gives you those deep, weighty blacks while the slight highlight reduction (-1) preserves the gentle highlight roll-off that film is famous for.
High/Low Key at -1 nudges the overall exposure slightly darker, which suits Tri-X's moody, grounded character and keeps highlights from blowing out in bright street light.
Clarity at +2 adds local mid-tone contrast that emphasizes texture — brick, fabric, weathered faces, wet pavement. This is a big part of the tactile, "you could touch it" quality of a good Tri-X print.
Grain Effect set to Strong is non-negotiable for an authentic Tri-X feel. Smooth, grainless digital files instantly break the illusion. The GR III's grain is convincing and reacts to ISO, so it intensifies naturally in low light — exactly as real film does.
Exposure compensation at -0.3 protects the highlights and deepens the blacks, biasing the image toward the dense, contrasty character of pushed Tri-X.
A High-Contrast "Pushed Tri-X" Variation
Photographers often pushed Tri-X to 1600 or even 3200 in low light, which amplified grain and contrast dramatically. To emulate that grittier, higher-energy look — perfect for night streets and concerts — try this variation:
- Image Control: Monochrome
- Filter Effect: Off
- High/Low Key Adjustment: -1
- Contrast: +3
- Contrast (Highlight): -1
- Contrast (Shadow): +3
- Sharpness: +1
- Clarity: +3
- Grain Effect: Strong
- ISO: Auto 1600–6400
- Exposure Compensation: -0.7
This pushes everything harder: blacker shadows, snappier mid-tones, and heavier grain from the higher ISO. It's punchy, raw, and unapologetically gritty — the look of a roll shot fast and developed hot.
A Softer "Classic Documentary" Variation
If the standard recipe feels too aggressive for portraits or quieter scenes, soften it for a gentler, mid-century documentary feel:
- Image Control: Monochrome
- Filter Effect: Yellow
- High/Low Key Adjustment: 0
- Contrast: +1
- Contrast (Highlight): -1
- Contrast (Shadow): +1
- Sharpness: 0
- Clarity: +1
- Grain Effect: Weak
- ISO: Auto 200–1600
- Exposure Compensation: 0
The Yellow filter effect darkens skies slightly and renders skin tones more naturally, while the reduced contrast and lighter grain keep the look smooth and flattering. This is the version to reach for when shooting people, family moments, or anything where you want elegance over edge.
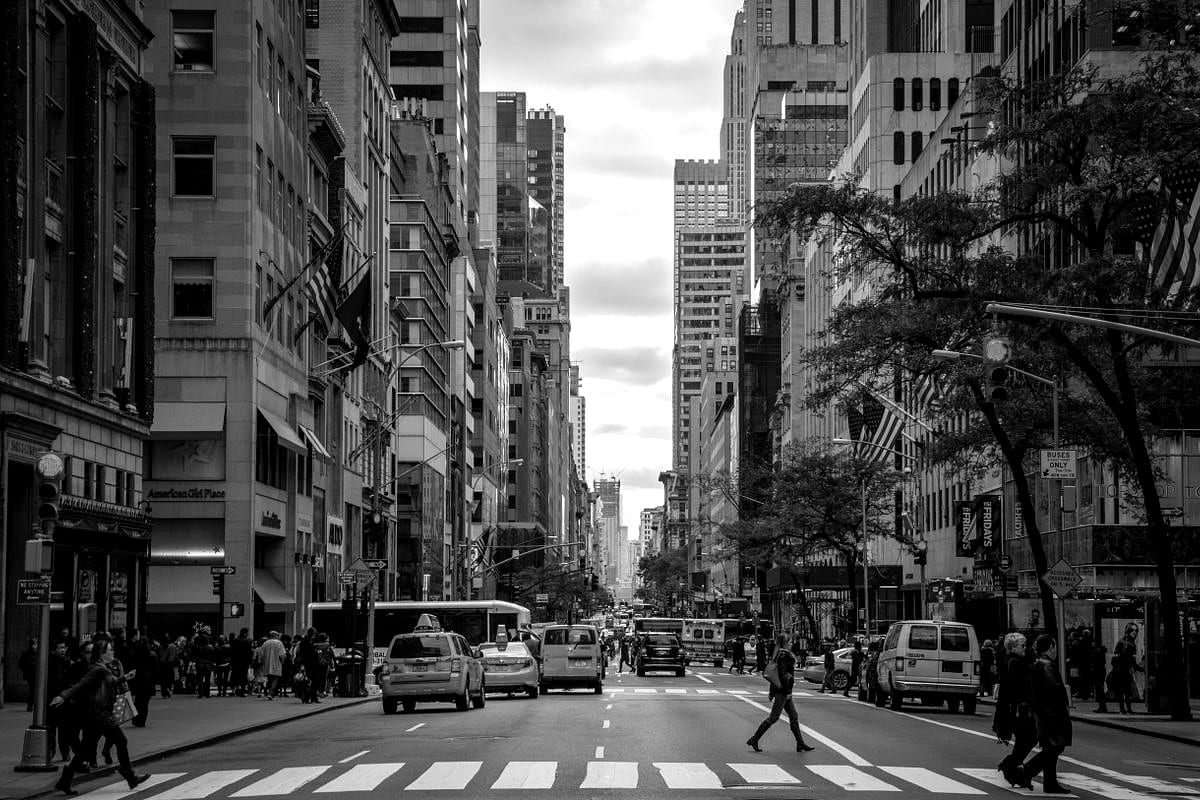
Best Subjects and Light for the Tri-X Look
Tri-X rewards certain conditions more than others. Lean into them:
- Hard, directional light — midday sun, low winter light, and strong shadows give the contrast something to work with. Tri-X loves drama.
- Street and documentary scenes — pedestrians, markets, transit, café windows. The grain and grit add narrative energy to everyday moments.
- Architecture and texture — peeling paint, brick, concrete, fire escapes, and rain-slicked pavement all come alive with high clarity and grain.
- Backlight and silhouettes — Tri-X handles dramatic backlight beautifully, rendering glowing highlights and inky shapes.
- Overcast days — don't shy away from flat light; the contrast settings rebuild the punch that grey skies remove.
Avoid relying on color cues for your compositions. In black and white, you're working with light, shape, and contrast — so look for tonal separation rather than colorful subjects.
Shooting Tips for Authentic Results
Shoot in Snap Focus. Tri-X is street film at heart. Set Snap Focus to 2m or 2.5m at f/8 and you'll have near-instant, zone-focused frames — exactly how documentary shooters worked with manual film cameras.
Expose for the highlights. Black and white tolerates deep shadows far better than blown highlights. The slight negative exposure compensation in the recipe already biases this way; in very bright scenes, dial in a touch more.
Embrace the grain at high ISO. Don't fight low light with a tripod and base ISO. Let the GR III climb to ISO 3200 or 6400 — the grain that results is the Tri-X look, not a flaw to be avoided.
Use the 28mm field of view to get close. Tri-X street work is intimate. The GR III's wide lens means you have to be near your subject, which is exactly where the most compelling frames live.
Review in monochrome, commit to monochrome. Shooting JPEG in this recipe gives you the finished look on the LCD, which trains your eye to see in black and white. If you shoot RAW+JPEG, you keep a color safety net while previewing the Tri-X rendering.
Final Thoughts
Kodak Tri-X 400 endures because it tells the truth with style — grain, grit, and tonal richness that no clean digital file quite matches on its own. With the Monochrome Image Control pushed toward contrast and a strong grain effect, the Ricoh GR III becomes a genuinely convincing Tri-X machine, ready in your pocket for the next decisive moment.
Load this recipe into a User mode, set Snap Focus, and go shoot a roll's worth of frames as if film were still loaded. You'll find the look — and the way it makes you slow down and see in black and white — is every bit as addictive as the real thing.
Want more black-and-white inspiration? Pair this with our Ricoh GR III black and white photography guide and our street photography settings guide to get the most out of the look.