Ricoh GR III Harsh Midday Sun Photography: Settings, Tips, and Best Recipes
Most photography advice tells you to avoid shooting between 10 AM and 3 PM. The light is overhead, shadows are short and hard, contrast is extreme, and colors can look washed out. But some of the most compelling street photography, architectural work, and graphic compositions happen precisely because of harsh midday light -- not in spite of it. The Ricoh GR III, with its wide dynamic range, built-in ND filter, and flexible image controls, is built to handle this demanding light if you know how to work with it.
This guide covers the settings, preset recipes, and techniques that turn the midday sun from a problem into a creative tool.
Why the Ricoh GR III Handles Harsh Light Well
The GR III has several features that make it surprisingly capable under the hardest midday conditions:
- APS-C sensor with wide dynamic range retains detail in both bright highlights and deep shadows, giving you room to work in extreme contrast scenes
- Built-in 2-stop ND filter lets you control exposure without stopping down, useful when you want to shoot wide open even in blinding sunlight
- Highlight and Shadow Adjustment in the image controls allows you to tame contrast directly in-camera without post-processing
- Snap Focus eliminates the hesitation of autofocus hunting when bright sun creates confusing high-contrast patterns
- 28mm equivalent field of view naturally includes both sunlit areas and shadow zones in a single frame, making graphic compositions easier
Essential Camera Settings for Harsh Midday Light
Shooting Mode: Aperture Priority or Manual
Aperture Priority (Av) is practical for walking around in changing light and shadow. Set your aperture and let the camera adjust the shutter speed as you move between sun and shade. Watch the exposure compensation dial closely -- you will use it constantly.
Manual mode (M) is better when you are composing a specific scene with a fixed light ratio. Meter the highlights, lock in your settings, and shoot without the camera second-guessing you as the frame balance shifts between bright and dark areas.
ISO Configuration
Midday sun provides an abundance of light, so keep ISO as low as possible for maximum image quality and dynamic range.
Set ISO through MENU > Shooting Settings > ISO Sensitivity:
- Fixed ISO 100 or 200 is your default for midday. There is no reason to push higher unless you are in deep shade.
- Auto ISO range: 100-800 with a minimum shutter speed of 1/250s. This keeps the sensor clean and the shutter fast enough to freeze motion and prevent any hand shake.
The GR III's base ISO of 100 delivers the widest dynamic range the sensor is capable of -- exactly what you need when the scene has extreme contrast between sunlit surfaces and shadows.
Metering: Spot or Center-Weighted
Multi-segment metering struggles in harsh light because the scene contains extreme brightness differences. The camera averages everything out and often overexposes highlights or underexposes shadows in unpredictable ways.
Spot metering is the most reliable choice. Meter on the specific tone you want to expose correctly -- a sunlit face, a bright wall, a shadow detail -- and let everything else fall where it falls. This gives you full creative control over the exposure.
Center-weighted metering is a solid alternative for faster shooting. It biases exposure toward the center of the frame, which is more predictable than multi-segment when you are composing with strong light and shadow.
Exposure Compensation
Midday light demands active exposure compensation. Use it aggressively:
- -0.7 to -1.3 EV to protect highlights and deepen shadow contrast for a bold, graphic look
- -0.3 to -0.5 EV as a general safety margin to prevent blowing out bright surfaces like white walls, concrete, and reflective materials
- +0.3 to +0.7 EV when you deliberately want to shoot into a shaded area and let the bright background blow out for a high-key effect
Check the histogram after your first few frames. In harsh midday light, a slight left-shift (darker overall exposure) usually produces better results because you can recover shadows more easily than blown highlights.
White Balance
Midday sunlight is close to neutral daylight color temperature, around 5200-5500K. Unlike golden hour, you are not trying to preserve or enhance a warm cast -- the creative potential here lives in contrast, not color temperature.
- Daylight (5200K) is the accurate, reliable choice that renders colors as they appear
- Auto White Balance is acceptable at midday since it does not need to fight an extreme color cast
- Shade (7500K) adds warmth if you want a sunbaked, Mediterranean feel to your midday images
- CTE can push any existing warm or cool cast in reflected light, useful for scenes with colored walls bouncing tinted light into shadows
Focus Settings
Autofocus generally works well in bright conditions, but high-contrast edges can confuse the AF system by pulling focus to a shadow boundary rather than your subject.
Snap Focus at 2.5m is the most reliable street shooting method in harsh light. Set it and forget it -- at f/5.6 or f/8, the depth of field covers most of what you need.
Touch AF is useful for precise compositions where you want to lock focus on a specific element like a person standing in a shaft of light surrounded by shadow.
The ND Filter Advantage
The GR III's built-in 2-stop ND filter is especially valuable at midday. Activate it through MENU > Shooting Settings > ND Filter or assign it to a function button for quick access.
Use the ND filter when:
- You want to shoot at f/2.8 in full sun for shallow depth of field without overexposure
- You need a slower shutter speed for motion blur effects even in bright conditions
- You are deliberately overexposing for creative high-key looks and need to bring the exposure back into range
Best Preset Recipes for Harsh Midday Light
Hard Light Monochrome
This recipe turns harsh midday contrast into dramatic black-and-white images with deep blacks and bright whites. Set Image Control to Monotone with a red filter effect to darken blue skies and make clouds pop against them. Push Contrast to +3 and set Sharpness to +2 for aggressive, graphic rendering. Enable Grain Effect at Low for a subtle film texture. Expose for the highlights and let the shadows go completely black.
| Setting | Value | |---------|-------| | Image Control | Monotone | | Filter Effect | Red | | Contrast | +3 | | Sharpness | +2 | | Grain Effect | Low | | White Balance | Daylight | | Exposure Comp | -0.7 EV |
Bleached Summer
A slightly overexposed, desaturated look that evokes the feeling of blinding summer sun. Set Image Control to Soft, Saturation to -2, and Contrast to -1 for a washed-out, airy feel. Push Key Adjustment to +1 to brighten the overall image. Use Daylight white balance and accept slightly blown highlights -- they are part of the look. This recipe works beautifully for beach scenes, whitewashed architecture, and sun-drenched streets.
| Setting | Value | |---------|-------| | Image Control | Soft | | Saturation | -2 | | Contrast | -1 | | Sharpness | -1 | | Key Adjustment | +1 | | White Balance | Daylight | | Exposure Comp | +0.3 EV |
Shadow Hunter
Designed to expose for shadow detail and let the highlights take care of themselves. Set Image Control to Standard, push Shadow Adjustment to +2 to open up dark areas, and set Highlight Adjustment to -2 to pull back bright tones. Keep Contrast at 0 and Saturation at +1 for slightly punchy colors in the recovered shadow areas. This recipe reveals the rich colors hiding in midday shade.
| Setting | Value | |---------|-------| | Image Control | Standard | | Highlight Adj | -2 | | Shadow Adj | +2 | | Contrast | 0 | | Saturation | +1 | | Sharpness | 0 | | White Balance | Daylight |
Sunbaked Vivid
For scenes where you want to lean into the intensity of midday -- saturated blue skies, vivid storefronts, bold primary colors baking in direct light. Set Image Control to Vivid, keep Saturation at 0 (Vivid already pushes saturation), and set Contrast to +1. Use Shade white balance to add a warm sunbaked tone across the image. Lower the Key Adjustment to -1 to slightly underexpose and deepen colors.
| Setting | Value | |---------|-------| | Image Control | Vivid | | Saturation | 0 | | Contrast | +1 | | Sharpness | +1 | | Key Adjustment | -1 | | White Balance | Shade | | Exposure Comp | -0.3 EV |
Noon Noir
A moody, cinematic recipe that treats harsh midday light like a film noir lighting setup. Set Image Control to Monotone with a green filter effect for smooth skin tones in black and white. Push Contrast to +2 and Sharpness to +1. Set Key Adjustment to -2 for an overall dark, brooding exposure. This recipe excels when you find strong directional light cutting through alleys, doorways, or arcades at midday.
| Setting | Value | |---------|-------| | Image Control | Monotone | | Filter Effect | Green | | Contrast | +2 | | Sharpness | +1 | | Key Adjustment | -2 | | White Balance | Daylight | | Exposure Comp | -1.0 EV |
Techniques for Better Midday Photography
Embrace the Shadows
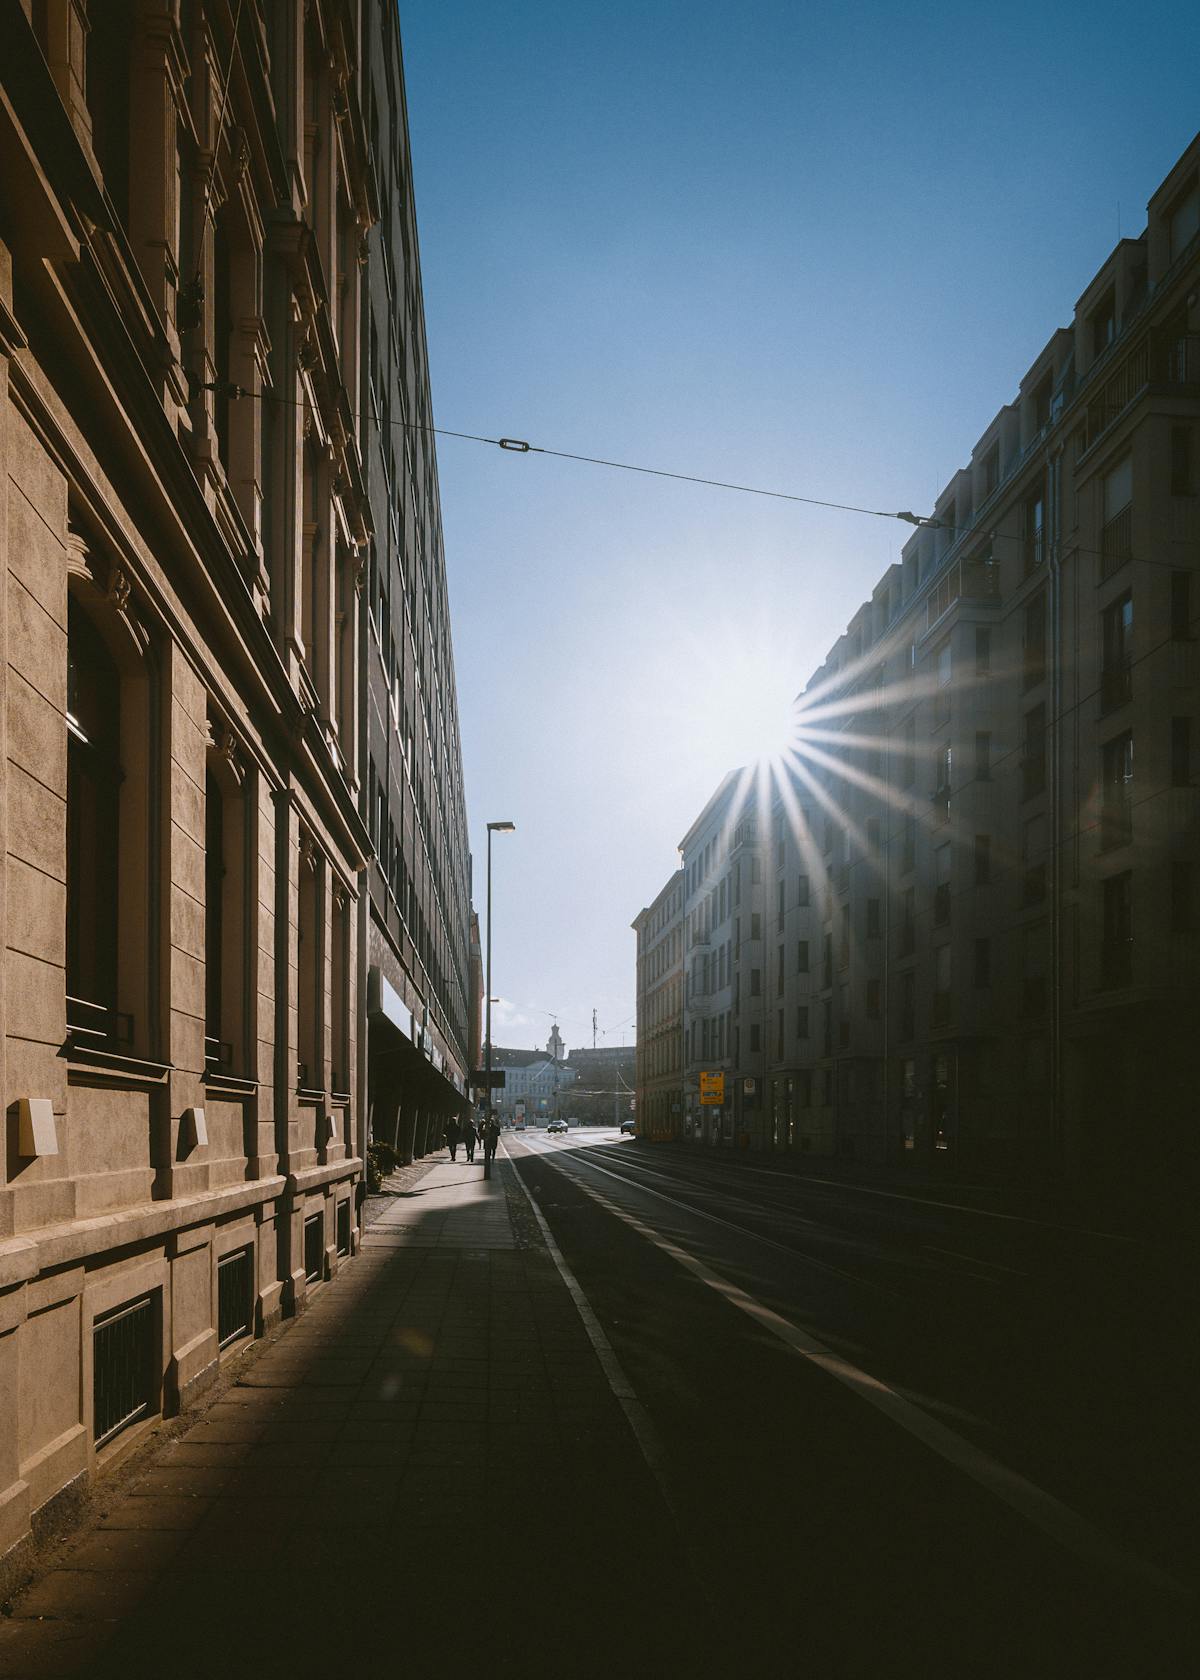
At midday, the sun is nearly overhead and shadows fall straight down. This creates hard geometric shadow patterns from buildings, overhangs, fences, and vegetation. Instead of fighting these shadows, use them as compositional elements. Frame a subject half in sun and half in shadow. Use the shadow line as a leading line or dividing element in your composition.
The GR III's 28mm field of view naturally captures the full contrast range of a sunlit scene, including both the bright areas and the deep shadows they create.
Find Pockets of Light
Midday sun creates intense beams of light in places that are otherwise shaded -- doorways, alleyways, gaps between buildings, covered markets, and underpasses. These isolated pools of light are natural spotlights. Wait for a subject to walk into one and shoot. The contrast between the bright spotlight and the dark surroundings creates instant drama with no additional effort.
Shoot Straight Down
When the sun is directly overhead, shoot directly down at the ground. Shadows become compact and graphic. Textures in pavement, sand, grass, and other surfaces are lit from above with maximum clarity. This perspective eliminates the sky from the frame entirely, removing the challenge of balancing extreme brightness differences.
Use Architecture as a Light Modifier
Buildings, walls, and overhangs act as natural light modifiers at midday. A deep overhang creates open shade with soft, even light underneath. A narrow alley channels overhead sunlight into a single bright strip on the ground. A white wall bounces harsh direct light into nearby shade, creating a natural fill light. Walk around and observe how the built environment sculpts the midday sun before you start shooting.
Shoot Through Shade to Sun
Position yourself in the shade and photograph subjects or scenes that are in full sunlight. This creates a natural frame of darkness around a brightly lit subject, drawing the eye directly where you want it. The GR III meters well from shade, and the contrast between your shaded foreground and the sunlit background creates powerful depth.
Work With Reflected Light
At midday, reflected light is everywhere -- bouncing off cars, windows, water, light-colored walls, and pavement. This reflected light fills shadows with color and creates secondary highlights that add dimension to harsh-lit scenes. Pay attention to what surfaces are reflecting light and where that light lands. A red wall bouncing warm light onto a shaded face, for instance, creates beautiful, unexpected color.
Common Midday Mistakes to Avoid
Trying to make it look like golden hour. Midday light has its own aesthetic. Trying to force warm tones and soft contrast on a scene that is naturally hard and graphic works against the light rather than with it. Lean into what midday gives you: boldness, clarity, and graphic contrast.
Leaving the lens hood off. Stray light hitting the front element causes flare and reduces contrast, which worsens in the intense midday sun. If you do not have a lens hood for the GR III, shade the lens with your hand when shooting toward bright surfaces.
Ignoring the histogram. Midday scenes often look fine on the LCD but have completely blown highlights when you review them later. The GR III's LCD is harder to read in bright sunlight, making the histogram your most reliable exposure feedback. Check it regularly.
Only shooting in direct sun. The most interesting midday photography happens at the boundary between sun and shade. Pure sunlight scenes can look flat and uniform. Pure shade scenes can look dull. The magic is where the two meet -- that high-contrast edge where graphic compositions live.
Pointing the camera up at buildings. Shooting upward puts the brightest part of the sky directly behind your subject, creating extreme backlighting that often blows out the sky entirely. Instead, shoot across or slightly down to keep the sky out of the frame or place it where you can control its exposure.
Practical Midday Shooting Scenarios
Street Photography at Noon
Use Snap Focus at 2.5m, f/5.6, and the Hard Light Monochrome recipe. Look for people crossing between sun and shade. The moment a person has half their body in light and half in shadow is the decisive moment at midday.
Architecture and Details
Switch to f/8 or f/11 for maximum sharpness. Use the Sunbaked Vivid recipe to bring out the color and texture of sunlit buildings. Focus on geometric patterns, repeating elements, and the interplay of structure and shadow.
Cafe and Market Scenes
Use the Shadow Hunter recipe to balance the bright exterior with the shaded interior of covered spaces. These transitional zones between sun and shade are where midday light becomes most interesting -- and where the GR III's dynamic range really shows its capability.
Putting It Together
Harsh midday sun is not a limitation -- it is a lighting condition with its own dramatic potential. The Ricoh GR III gives you the tools to work with it: an ND filter to manage exposure, highlight and shadow adjustments to tame contrast, and snap focus to keep you shooting fast when the light is unforgiving. Stop waiting for golden hour and start exploring what the midday sun can do.
Explore our high-contrast and harsh-light presets for more recipes designed for challenging lighting, or grab a complete preset bundle that covers every lighting condition from dawn to the blazing midday sun and beyond.