Ricoh GR III Waterfall & River Photography: Settings, Recipes, and Field Techniques
Waterfall and river photography rewards patience and precision -- the interplay of water, light, and stone creates images that feel alive with motion and energy. The Ricoh GR III, with its built-in ND filter and sharp 28mm lens, is a surprisingly powerful tool for this genre. Whether you're standing at the base of a thundering cascade or framing a quiet forest stream, this guide covers the settings, recipes, and field techniques you need to get the shot.
Why the Ricoh GR III Works for Waterfall & River Photography
Carrying a full camera kit on a muddy trail to a remote waterfall is nobody's idea of a good time. The GR III changes the equation:
- Built-in 2-stop ND filter slows shutter speeds for silky water without carrying external filters
- 257g body weight means no added burden on long hikes to remote waterfalls
- Weather-sealed design handles the constant mist and spray near cascades better than most compacts
- APS-C sensor with excellent dynamic range captures detail in both bright water highlights and deep shadow behind rocks
- 28mm equivalent field of view frames waterfalls with surrounding context -- forest canopy, rock formations, mossy banks
- 3-axis Shake Reduction allows handheld shots in the 1/4s to 1/2s range for a subtle motion blur effect
Essential Camera Settings for Waterfall & River Photography
Shooting Mode: Aperture Priority (Av) or Manual (M)
For most waterfall work, Aperture Priority gives you fast, reliable results. Set your aperture, let the camera handle shutter speed, and use exposure compensation to fine-tune. Switch to Manual mode when you need precise control over shutter speed -- particularly when you want a specific blur effect or when the scene's brightness keeps shifting as clouds pass overhead.
Aperture Selection
- f/5.6 - f/8 is the sweet spot for the GR III's lens -- maximum sharpness across the frame. Use this range when you have enough light reduction from the ND filter or low ambient light to get the shutter speed you want.
- f/11 extends depth of field to keep both foreground rocks and distant falls sharp. Some minor diffraction softening is invisible at normal viewing sizes.
- f/16 forces the shutter even slower in bright conditions but introduces noticeable diffraction. Use it as a last resort when you need a longer exposure and the ND filter alone isn't enough.
ISO Configuration
Lock ISO to 100 for waterfall and river photography. There is no reason to go higher -- you want the slowest possible shutter speed, the cleanest files, and the widest dynamic range. Navigate to MENU > Shooting Settings > ISO Sensitivity and set it to 100 with Auto ISO disabled.
Shutter Speed Guide for Water Effects
The look of moving water changes dramatically with shutter speed. Here's what to expect:
| Effect | Shutter Speed | Best For | |--------|--------------|----------| | Frozen droplets | 1/500s or faster | Powerful waterfalls with dramatic splash | | Textured blur | 1/4s - 1/2s | Preserving water structure with sense of motion | | Silky flow | 1s - 4s | Streams, small cascades, river currents | | Cotton-smooth cascade | 4s - 15s | Large waterfalls, wide river scenes | | Misty veil | 15s - 30s | Thin waterfalls, gentle streams, dreamlike effect |
The sweet spot for most waterfall photography is 1 to 4 seconds -- long enough to smooth the water beautifully while preserving texture and directionality in the flow.
Using the Built-in ND Filter
Activate the GR III's 2-stop ND filter through MENU > Shooting Settings > ND Filter > On, or assign it to a function button for quick access. This filter is essential for waterfall photography in daylight. At ISO 100, f/8, with the ND filter engaged, you can typically achieve shutter speeds around 1/4s to 1s in open shade -- enough for a pleasing water blur without any external accessories.
For midday shooting when light is abundant, combine the ND filter with a narrower aperture (f/11-f/16) to push into the 1-2 second range. If you need exposures longer than 4 seconds in daylight, you'll want to add an external ND filter on an adapter ring.
White Balance
Set white balance manually for consistency across a series of shots:
- Daylight (5200K) for open waterfalls with direct or indirect sunlight -- neutral, true-to-life colors
- Shade (7000K) for waterfalls in deep forest shade -- warms up the blue cast that shade naturally creates
- CTE (Color Temperature Enhancement) for golden hour waterfalls -- intensifies warm amber tones reflecting off the water
Avoid Auto White Balance if you plan to stitch a panorama or want consistent color across multiple compositions of the same waterfall.
Focus Settings
Moving water confuses autofocus. Use one of these approaches:
- Manual Focus (MF) -- focus on a static element like a rock at the base of the falls, then recompose. This is the most reliable method.
- Snap Focus at 2.5m or 5m -- excellent for quickly framing a scene where everything is within a predictable distance range. At f/8 with snap at 2.5m, everything from roughly 1.5m to infinity will be acceptably sharp.
- AF with focus lock -- tap the shutter halfway to lock focus on a stationary rock or tree, hold the button, then recompose. Works well when you're shooting handheld and moving quickly between compositions.
Best Preset Recipes for Waterfall & River Photography
Lush Forest Cascade
Designed for waterfalls surrounded by green foliage -- the most common scenario. Boost saturation to +1 to enhance the greens in moss, ferns, and tree canopy. Lower contrast to -1 to retain detail in both the bright white water and dark shadow areas behind the falls. Keep sharpening at +2 to maintain crispness in rocks and foliage against the soft water blur. Set white balance to Shade to warm the natural blue cast of forest shade.
| Setting | Value | |---------|-------| | Image Control | Vivid | | Saturation | +1 | | Hue | 0 | | Contrast | -1 | | Sharpness | +2 | | Shading | 0 | | White Balance | Shade (7000K) |
Moody River Monochrome
Black and white strips a river scene down to pure form -- water texture, rock geometry, light and shadow. Use the GR III's Hard Monotone image control for deep blacks and a subtle film grain. Push contrast to +2 so dark wet rocks go truly black while the water stays bright. Add a red filter effect to darken green foliage and brighten clouds, creating dramatic tonal separation between water, stone, and sky.
| Setting | Value | |---------|-------| | Image Control | Hard Monotone | | Filter Effect | Red | | Contrast | +2 | | Sharpness | +2 | | Toning | 0 |
Golden Hour Rapids
For the magic hour when warm light skims across the surface of a river. Use CTE white balance to push the golden tones further. Increase saturation to +2 to intensify the warm reflections on the water surface. Drop contrast to -1 to preserve bright highlights in the sky and water. This recipe turns an ordinary river scene into a glowing, atmospheric composition.
| Setting | Value | |---------|-------| | Image Control | Vivid | | Saturation | +2 | | Hue | 0 | | Contrast | -1 | | Sharpness | +1 | | Shading | 0 | | White Balance | CTE |
Cool Mist Ethereal
A desaturated, cool-toned recipe that emphasizes the misty atmosphere around waterfalls. Lower saturation to -1 for a muted, cinematic palette. Set white balance to Daylight and shift hue to -1 for a slightly cool cast that enhances the feeling of mist and spray. Keep contrast neutral so the image feels soft and atmospheric rather than flat or punchy.
| Setting | Value | |---------|-------| | Image Control | Standard | | Saturation | -1 | | Hue | -1 | | Contrast | 0 | | Sharpness | +1 | | Shading | 0 | | White Balance | Daylight (5200K) |
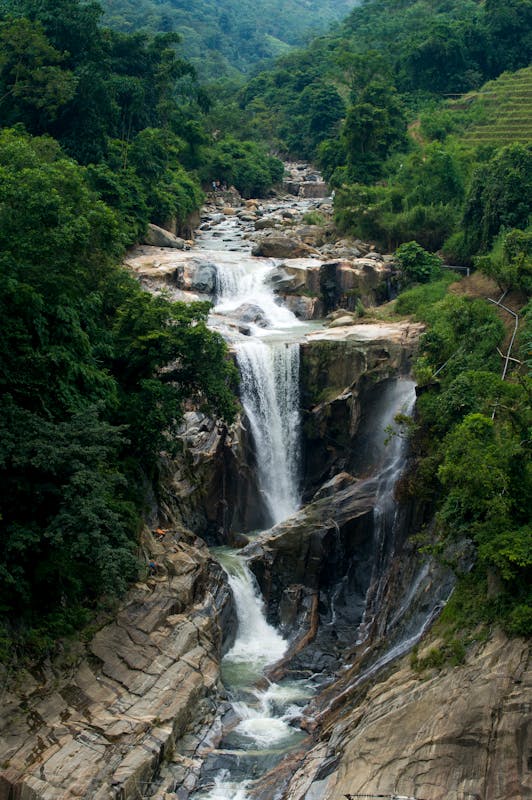
Composition Techniques for Waterfalls and Rivers
Lead the Eye with the Water's Path
Rivers and streams are natural leading lines. Position yourself so the water flows from a corner of the frame toward your main subject -- the waterfall, a prominent rock, or a bend in the river. At 28mm, the GR III's wide field of view lets you include a generous amount of foreground water to create depth.
Use Rocks as Foreground Anchors
Wet rocks with flowing water around them create powerful foreground interest. Get low and close to a rock in the stream, let it dominate the bottom third of the frame, and place the waterfall in the upper portion. The contrast between a sharp, textured rock and silky water around it is one of the most effective compositions in this genre.
Frame with Overhanging Foliage
Look for branches, ferns, or leaves that naturally frame the waterfall from above or the sides. This adds depth and layers to the composition, drawing the viewer's eye into the scene rather than across it.
Go Vertical for Tall Cascades
The GR III's 3:2 aspect ratio in portrait orientation is perfect for tall, narrow waterfalls. Don't default to landscape orientation -- many waterfalls are better served by a vertical composition that captures the full height of the cascade from top to plunge pool.
Include Scale
A person, bridge, or recognizable object near the waterfall gives the viewer a sense of scale. Without a reference point, even a massive waterfall can look underwhelming in a photograph. If you're shooting solo, use the 10-second self-timer and position yourself in the frame.
Field Tips for Better Waterfall Photos
Timing and Light
- Overcast days are ideal. Cloud cover acts as a giant softbox, eliminating harsh shadows and reducing the dynamic range between bright water and dark surroundings. This makes it easier to capture detail across the entire scene.
- Avoid direct midday sun hitting the waterfall. The contrast between sunlit water spray and shadowed rock becomes nearly impossible to expose correctly.
- Golden hour adds beautiful warm tones but is only available for waterfalls that face west (sunset) or east (sunrise). Scout your location in advance.
- After rain is prime time. Water volume increases dramatically, turning modest cascades into impressive falls. Rivers run higher and faster, creating more dynamic compositions.
Dealing with Spray and Mist
Waterfall spray is the biggest practical challenge for the GR III photographer:
- Carry a lens cloth and wipe the front element between every shot. Even a single water droplet on the lens creates a soft spot in your image.
- Shoot between gusts of spray. Most waterfalls have a rhythm -- watch the mist pattern and time your exposure for a clear moment.
- Shield the camera with your body or a hat between shots. Don't leave the lens exposed to constant spray.
- Check your images at 100% zoom on the LCD. Spray droplets are often invisible in the small preview but obvious when you zoom in.
Stability on Uneven Terrain
Tripod work near waterfalls means dealing with wet rocks, slippery moss, and uneven ground:
- A mini tripod (GorillaPod or Manfrotto PIXI) is easier to stabilize on rocks than a full-size tripod. The GR III's light weight is a major advantage here.
- Weight the tripod by hanging your bag from the center column or wrapping the strap around a rock to prevent vibration from wind or water flow.
- Use the 2-second self-timer or the Image Sync app to trigger the shutter without touching the camera.
- Disable Shake Reduction on a tripod -- it can introduce micro-vibrations when the camera is already stable.
Shoot RAW + JPEG
Waterfall scenes have challenging dynamic range -- bright white water against dark rock and shadow. Shooting RAW gives you the latitude to recover highlight detail in the water and lift shadows in the rocks during post-processing. The JPEG gives you an instant preview with your recipe applied.
Enable this in MENU > Shooting Settings > JPEG/RAW Setting > RAW+.
Recommended Accessories
- Mini tripod -- non-negotiable for exposures over 1/2 second. The GR III's light weight means even the smallest tripod provides adequate stability.
- External ND filter (6-stop or 10-stop) with a filter adapter -- opens up long exposure possibilities in bright daylight that the built-in 2-stop ND cannot achieve alone.
- Microfiber lens cloth -- you will use this constantly near waterfalls.
- Waterproof pouch or bag -- protects the GR III during hikes to the falls and when not actively shooting.
- Spare battery -- cold water and long exposures drain batteries faster than normal shooting.
Conclusion
Waterfall and river photography is one of the most rewarding genres you can explore with the Ricoh GR III. The camera's compact size makes it easy to carry on long hikes, its built-in ND filter handles the technical demands of slowing water, and its excellent sensor captures the full dynamic range of these high-contrast scenes. Start with the settings and recipes in this guide, then experiment with different shutter speeds and compositions at your favorite waterfall. Every cascade has its own character -- finding the exposure that reveals it is half the joy.
Looking for more GR III recipes to elevate your waterfall photography? Browse our curated preset collections designed specifically for the Ricoh GR III, or explore our complete guide to film recipes for 2026.